Showing posts with label Stampers Anonymous. Show all posts

Nov 25, 2024

Snowy Winter Tag and Card

 Getting ready for the holidays here at CutCardStock. Today I am showing you how to create a home decor winter tag plus a matching card!

Oct 16, 2024

Nov 6, 2023

Compare Distress Oxide Inks on Different Surfaces - What's the Difference?

 Happy Fall my friends! Today I am posting for The Funkie Junkie Boutique. We are presenting fall leafy projects this time around, and I decided to see how stamped Distress Oxide Inks look on different card bases.


I have a YouTube video HERE if you prefer to watch the process.


Choose Your Card Panels

Distress Oxide Inks, a mixture of dye and pigment ink have some unique properties. They show up on darker cardstocks, and seem to light up when spritzed with water. I selected the following types of cardstock to try this out. Cardstocks include Kraft, Cougar White 80 lb., Cougar Natural, Ranger Wood Grained, Black, Dark Brown and Olive Green.

Stamp All the Card Panels


I selected CMS450 Leaf Print 1 for all of the panels, stamping with Seedless Preserves, Rusty Hinge, Crushed Olive, Crackling Campfire and Vintage Photo Distress Oxide Ink Pads. You could also use Leaf Print 2 or another leaf stamp set.


Attach four of the leaf prints to acrylic blocks for ease in stamping. Using the large Maple leaf, ink with Seedless Preserves Oxide Ink. Stamp on the left side of all the bases at an angle. This one happens to be on Natural Cougar Cardstock.


Select another large stamp and ink with Crushed Olive. Stamp this one on the right side at an angle to start a fan inspired print.

Do the same with two additional leaf stamps using Crackling Campfire and Rusty Hinge to fill in the fan.

Using  CMS Shattered Background, ink with Walnut Stain and stamp over the entire panel. After stamping the first one, I changed my approach and left an opening in the center so the leaves weren't stamped over.

Assemble the Cards

Prepare Kraft A2 card bases for all the panels except the black panel. It is mounted on a white card base with an orange panel to highlight the leaves.

Trim the panels to 3.75 x 5.0 inches using the Deckle Edge Trimmer. This adds some interest to the cards. 

Here is the leaves stamped on dark brown cardstock.

Select Gratitude Small Talk Stickers from the book. Note: this is an older product I have in my stash. You could use Tiny Text stamps or other small sentiment stamps to make your own strips.

Glue the strips on white cardstock to add dimension. Using a blending tool, ink the sentiments with Cracklin Campfire to add color. Trim the strips and attach to the card panels.


Using a blending tool, add color to the perimeter of the panel prior to adding to the card base. Note - do not ink blend the back or brown panel.

Tie a piece of twine around the panel prior to attaching to the card base.

Add interest to the kraft envelope by stamping a leaf in the lower left front corner in the color of your choice.

Let's Look at all the Difference Between the Panels


White Cougar 80 lb. Cardstock


Ranger Wood Grain Card Stock - I love the additional texture.


Natural Card Stock


Brown Card Stock


Black Card Stock


Green Card Stock

Thanks so much for stopping by today! Be sure to visit The Funkie Junkie Boutique! They carry a great variety of products! I'd love to hear which color panel you like the most.  Leave me a comment below.

I'd love to have you follow/subscribe on my social media sites Instagram, Facebook, Blogger and YouTube all named TerisMailbox. Be well. Be creative!

Products used:
CMS 450 Leaf Print 2 (I used Leaf Print 1) 
Ideology Small Talk Stickers - Occasions from my stash
Kraft Cardstock
Cougar White 80 lb.
Cougar Natural
Ranger Wood Grained Cardstock
Black Cardstock
Dark Brown Cardstock
Olive Green Cardstock


Nov 25, 2022

Vintage Snowy Winter Tag

 Hello friends. I am here to share a fun snowy winter scene.


I used stencils from the most recent Stampers Anonymous Release as well as Darling Deer and Paper Village Die from Sizzix.

I started by creating the tag using Kraft Chipboard and then cut a piece of Distress Mixed Media Heavyweight. 

I ink smooshed that piece in my favorite color combo: Shabby Shutters, Old Paper and Bundled Sage. It makes a great background for the PineCone Stencil.


I did a mono print by spraying the stencil with Bundled Sage, wiping off the borders and printing the stencil on the Mixed Media Heavyweight. Be sure to use a paper towel to soak up the excess ink.

Once that dried, I used blending brushes to add color to the pinecones and the needles. Colors used were Walnut Stain and Rustic Wilderness.

I used Wonder from the Tim Holtz Elements Stencil and ink blended with Walnut Stain. I quickly added a layer of Clear Embossing Powder to make it pop!


I die cut the houses from Kraft Chipboard and coated with Rustic Wilderness and Vintage Photo Embossing Glaze. I did run the coordinating ink pads on first to lay down some color. I cut the roofs from black cardstock. Notice I did not use the entire house, but trimmed them to be about 1/4 inch deep. The deer is from the Sizzix Darling Deer Die set. The tiny bottlebrush tree is colored with Rustic Wilderness Spray Stain.


I made the shelf from Chipboard by scoring the 4.5 inch wide strip at 1/4, 1/2, 5/8 and 1/4 inches to form the triangular shelf.

After attaching and sewing the pinecone piece to another Chipboard piece, I used my hot glue gun to attach the shelf, houses and tree. I did add a couple of small greenery pieces behind the houses.

Gritpaste Snowfall on the shelf and the rooftops was the perfect addition.


I topped the piece off with a piece of Rayon Seam binding dyed with Rustic Wilderness Ink, tied with twine and a twinkle bell.

I hope you have enjoyed my newest tag!

Sep 21, 2022

Mixed Media Friendship Tag

 Hello friends. I'm posting another colorful tag for The Funkie Junkie Boutique featuring friendships. I had a great time creating this tag with its multiple layers of inky goodness! Check out all the talented designer's project on their Blog Here


Aug 10, 2022

Layered Beachy Scene

 Greetings Friends! Having a summery blast today posting for The Funkie Junkie Boutique! Our current Challenge is Chillin' in the Heat using either warmer or cooler colors. I'm headed to the beach with Glady's!  We have a challenge over on the Funkie Junkie Boutique Blog. Check the deets HERE. Would love to have you join in the fun!


The flock of flamingos appears quite happy in the sunshine!

Feb 26, 2022

Saturday Showcase - Stampers Anonymous Floral Outlines Stamp

 Hello fellow Junkies. Its Teri with TerisMailbox here sharing a product for The Funkie Junkie Boutique. As soon as Tim released The Floral Outlines stamp, I was smitten. Today I am sharing six different cards all using the Floral Outlines Stamp.


Jan 12, 2022

Starting 2022 off with Layered Decor Tag

 Hello friends. I am so happy to be continuing on the Funkie Junkie's Design Team. Today I am sharing a very layered Etcetera Tag using Old and New Products!


Check out all the layers on this one.  I have a video here if you'd like to just jump there. Here is the link if the video doesn't appear (https://youtu.be/wxaXLjYT1ho).


As you can see, the Etcetera Tag has multiple layers, beginning with Distress Heavyweight Cardstock, ink smooshed with Villaneous Potion, Bundled Sage and Old Paper. Love this combo.  The top left is die cut using the Mixed Media #2 die from Sizzix, another oldie in my collection. There are also layers of stenciling and stamping using Deco Arch stencil, Ledger Script and Faded Type Stamps. The "OLD" to fit the theme comes from using The Fairytale Frenzy Stamp CMS058! I used both a floral bloom to stamp with Hickory Smoke Archival Ink and the Sentiment stamped with Black Soot Archival ink on cardstock with Bundled Sage Oxide Ink. The inks are from the Archival 4 Pack Basic set.


Check out the Crackle Texture Paste, colored with Old Paper ink and applied through an early stencil. Once that dried and was topped with Collage Medium, I used the Wilted Violet Distress Crayon from Set #4 to color in the cracks.


The Perspective Butterfly Die is one of my favorites - so detailed and a great size! I have all the deets in the YouTube video above showing how I ink blended with Old Paper, Villainous Potion, splattered with the Hocus Pocus Mica Stains from the Halloween Release and coated with Distress Resist Spray. I also cut the body out with Black Cardstock for contrast.

We'd love to have you join in on the first challenge for 2022! Check the Funkie Junkie Challenge Blog for deets.

Thanks so much for stopping by today! I'd love to have you follow/subscribe on my social media sites Instagram, Facebook, Blogger and You Tube.  Be well. Be creative!


Nov 3, 2021

Layered Die Cut Moose Tag

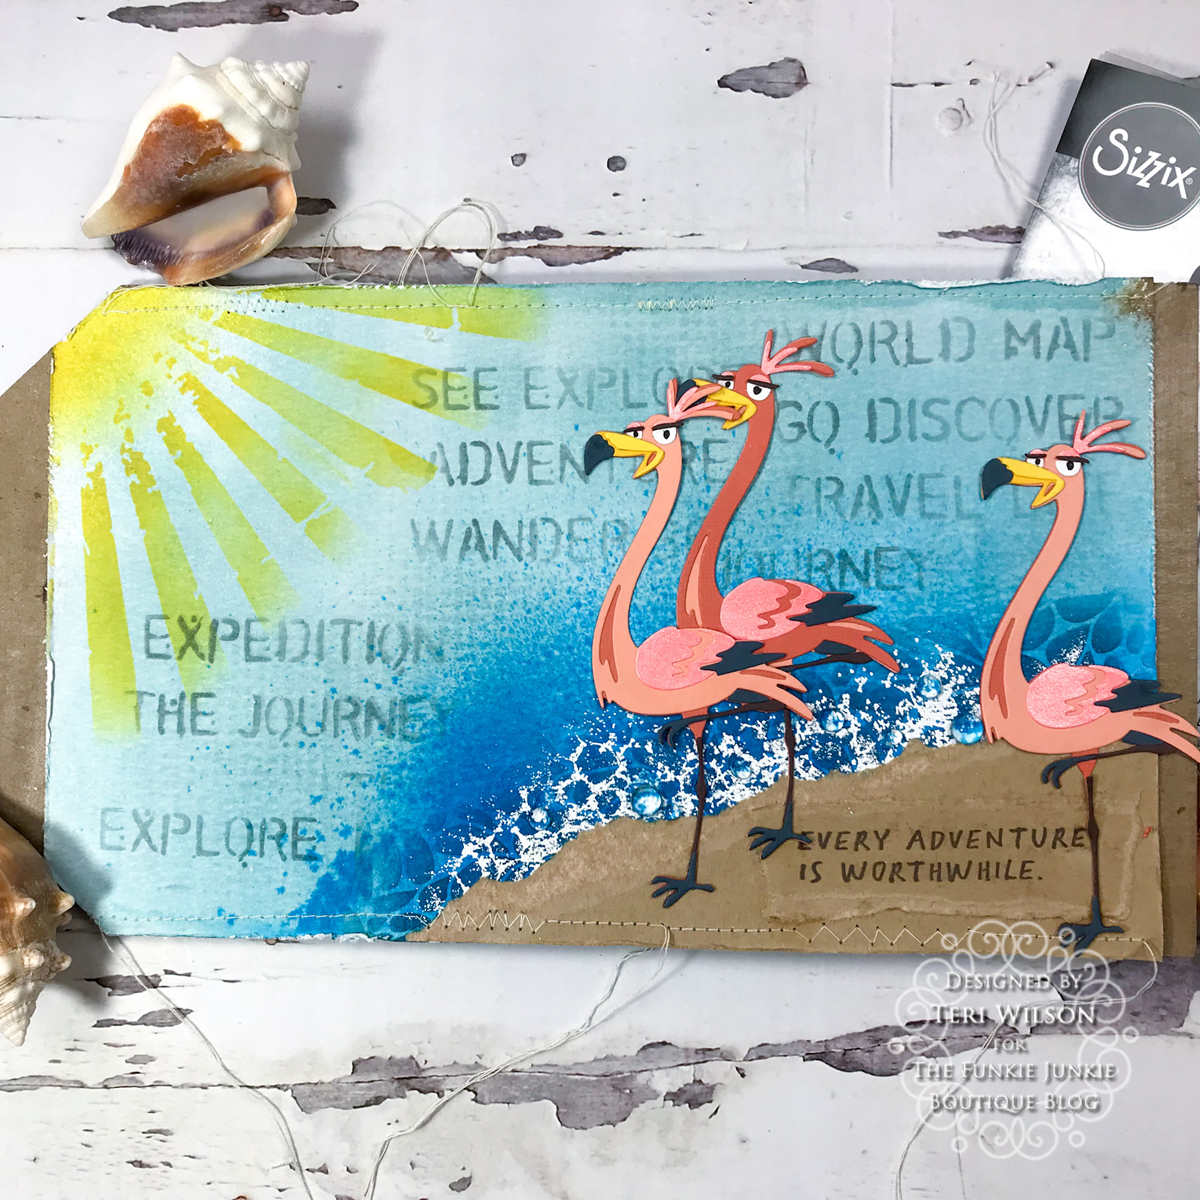
 Hello friends! I'm back with a fun Etcetera Tag designed for The Funkie Junkie Boutique. This challenge theme is living creatures.  The moose from Into the Woods Stamp by Stampers Anonymous was perfect for the scene I had in mind!


Oct 23, 2021

Saturday Showcase - Leaf Fragments

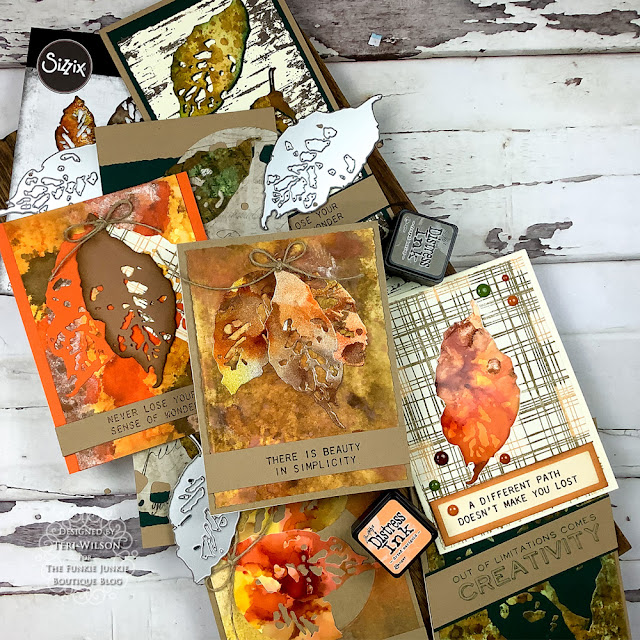
  Hi Funkie Junkie Friends! Its Teri With TerisMailbox posting for the Saturday Showcase from The Funkie Junkie Boutique.  As soon as I saw the Leaf Fragments Dies by Tim Holtz, I knew I had to have them.  Today I present seven different cards using these versatile dies.

Oct 6, 2021

Hello friends, I am posting today for The Funkie Junkie Boutique. Please consider joining our challenge on the blog. Deets at the end of this post. I love the concept of Gratitude and being Thankful. Use fall colors and embellishments to create a tag or project expressing gratitude. Here is the next edition in my Etcetera Tag Series.

Sep 8, 2021

Die-na-mite Dies for the win

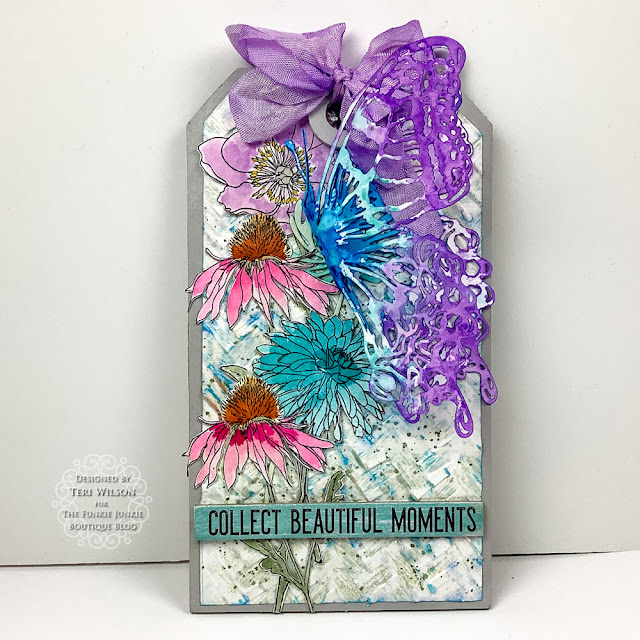
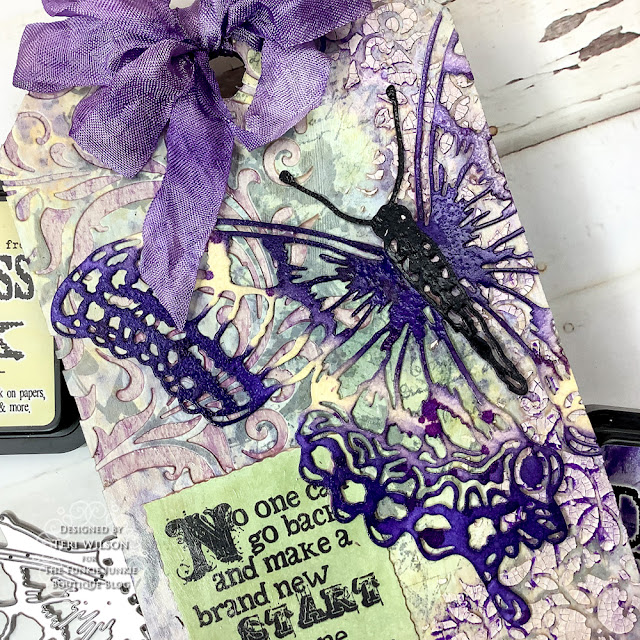
 Greetings again crafty friends. I am posting today for The Funkie Junkie Boutique. The new challenge is to use dies in your projects. They can be the main focus or incorporated into your design. I love the Perspective Butterfly Die and was determined to incorporate it into my design for this challenge.


Mar 17, 2020

Lucky Friends

 Greetings Friends. I am posting today for CutCardStock. I love the great variety of cardstock they carry, the great customer service and fast shipping! I count myself LUCKY to be continuing on the design team!


Jun 13, 2019

Double Framed Window Card for CutCardStock

Greetings crafty friends! I am pleased to present this fun tri-fold card showcasing Mini Bouquet and Flower Garden sets from Stampers Anonymous!  I am posting for CutCardStock.


Recent Posts