Showing posts with label The Funkie Junkie Boutique. Show all posts

Dec 18, 2023

Candy Shop Holiday Decor

 Today I am posting for The Funkie Junkie Inspiration Blog. The theme is Holiday Homecoming: Celebrate with Family and Food. Today I present my candy shop home decor piece. My favorite food is candy!

Nov 6, 2023

Compare Distress Oxide Inks on Different Surfaces - What's the Difference?

 Happy Fall my friends! Today I am posting for The Funkie Junkie Boutique. We are presenting fall leafy projects this time around, and I decided to see how stamped Distress Oxide Inks look on different card bases.


I have a YouTube video HERE if you prefer to watch the process.


Choose Your Card Panels

Distress Oxide Inks, a mixture of dye and pigment ink have some unique properties. They show up on darker cardstocks, and seem to light up when spritzed with water. I selected the following types of cardstock to try this out. Cardstocks include Kraft, Cougar White 80 lb., Cougar Natural, Ranger Wood Grained, Black, Dark Brown and Olive Green.

Stamp All the Card Panels


I selected CMS450 Leaf Print 1 for all of the panels, stamping with Seedless Preserves, Rusty Hinge, Crushed Olive, Crackling Campfire and Vintage Photo Distress Oxide Ink Pads. You could also use Leaf Print 2 or another leaf stamp set.


Attach four of the leaf prints to acrylic blocks for ease in stamping. Using the large Maple leaf, ink with Seedless Preserves Oxide Ink. Stamp on the left side of all the bases at an angle. This one happens to be on Natural Cougar Cardstock.


Select another large stamp and ink with Crushed Olive. Stamp this one on the right side at an angle to start a fan inspired print.

Do the same with two additional leaf stamps using Crackling Campfire and Rusty Hinge to fill in the fan.

Using  CMS Shattered Background, ink with Walnut Stain and stamp over the entire panel. After stamping the first one, I changed my approach and left an opening in the center so the leaves weren't stamped over.

Assemble the Cards

Prepare Kraft A2 card bases for all the panels except the black panel. It is mounted on a white card base with an orange panel to highlight the leaves.

Trim the panels to 3.75 x 5.0 inches using the Deckle Edge Trimmer. This adds some interest to the cards. 

Here is the leaves stamped on dark brown cardstock.

Select Gratitude Small Talk Stickers from the book. Note: this is an older product I have in my stash. You could use Tiny Text stamps or other small sentiment stamps to make your own strips.

Glue the strips on white cardstock to add dimension. Using a blending tool, ink the sentiments with Cracklin Campfire to add color. Trim the strips and attach to the card panels.


Using a blending tool, add color to the perimeter of the panel prior to adding to the card base. Note - do not ink blend the back or brown panel.

Tie a piece of twine around the panel prior to attaching to the card base.

Add interest to the kraft envelope by stamping a leaf in the lower left front corner in the color of your choice.

Let's Look at all the Difference Between the Panels


White Cougar 80 lb. Cardstock


Ranger Wood Grain Card Stock - I love the additional texture.


Natural Card Stock


Brown Card Stock


Black Card Stock


Green Card Stock

Thanks so much for stopping by today! Be sure to visit The Funkie Junkie Boutique! They carry a great variety of products! I'd love to hear which color panel you like the most.  Leave me a comment below.

I'd love to have you follow/subscribe on my social media sites Instagram, Facebook, Blogger and YouTube all named TerisMailbox. Be well. Be creative!

Products used:
CMS 450 Leaf Print 2 (I used Leaf Print 1) 
Ideology Small Talk Stickers - Occasions from my stash
Kraft Cardstock
Cougar White 80 lb.
Cougar Natural
Ranger Wood Grained Cardstock
Black Cardstock
Dark Brown Cardstock
Olive Green Cardstock


Oct 2, 2023

Create a Scene: Spooky Mixed Media Halloween Tag

 Hello and Happy fall! Today I am posting for The Funkie Junkie Boutique. Check out this very spooky scene created with an etcetera tag and layers of spooky goodness!

Jul 3, 2023

Fly Away Butterfly Box

 Hello friends. Today I am posting for the FunkieJunkie Boutique! Our DT challenge was to use your favorite Tim Holtz product. Soooo how do you choose? After giving it some thought, I decided to focus on my favorite inks. Yes I am a full set syndrome girl. Here is my rainbow Butterfly Box. Can't wait to display in my studio!

Mar 13, 2023

Add Die Cuts for Dimension

 Hello friends. Today I am posting for The Funkie Junkie Boutique. Learn how I layered the new Brushstroke Flower Minis on a stamped floral background to create this Inspirational Vignette Box.


Check out all the yummy colors and layers! 

Jan 30, 2023

Wintery Tag Using Multiple Techniques

 Create a Home Decor Tag using multiple create techniques! Hi, I am posting for The Funkie Junkie Boutique today.


I continue on my tag decor journey with a Wintery Scene using multiple creative techniques.

The video is here: https://youtu.be/TOJx3sMdElc


Create the Base

Trim a piece of Distress Watercolor Paper to fit a Mini Etcetera Tag.

Emboss the top left side with the Pine Branches Embossing folder.

Using a stamp positioner and Embossing Ink, arrange a stamp a few snowflakes on the watercolor piece. Use clear embossing powder and heat set.


Ink smoosh the background with Weathered Wood, Stormy Sky and Speckled Egg Distress Inks to create a cloudy winter sky. Once the inks are completely dry, use Distress Crayons (Rustic Wilderness and Vintage Photo) to add color to the Pine Branches. Use a Watercolor Brush to smooth the color out.

Attach a few small snowflakes from the Twig&Stump die set. I used sparkly paper.

Die Cut the Houses

Die Cut two houses and coordinating Roofs using the Paper Village Die set. Use chipboard or recycled cardboard such a Kleenex boxes or cereal boxes. Paint with white Gesso. Once the pieces are dry, glue two house pieces together and trim so you have one front plus about 1/2 inch of the two side panels. Score the side panels at 1/4 inch so you now have 1/4 inch side plus1/4 inch to attach to the base. Paint the roofs with Black Acrylic Paint.

Coat the two houses with and Embossing Dauber and coat one house with Rustic Wilderness Embossing Glaze and the other with Prize Ribbon Embossing Glaze. Heat set and set aside.


Finish the Additional Pieces 

Select two small tress and set in a box so you can spray without covering your craft area. Spray the trees with Rustic Wilderness Distress Ink and Oxide Sprays and set aside. Once dry, add some Collage Medium to the craft mat, pick up with a pallet knife and spread vertically up the trees. Add Mica Flakes and set aside.


Use Rustic Wilderness Embossing Glaze with the Embossing Dauber to cover the Quote Chip of your choice. Heat set.

Make a shelf for the scene using chipboard. Cut the board to the width of the Etcetera Tag and 2 1/2 inches wide. Score at 1/4, 1 inch, and 1 3/4 inches. Fld and glue the 1/4 inch piece together.

Assemble the Tag


Use Collage Medium to attach the Watercolor Panel to the Etcetera Tag and set aside to dry. Ink the edges with Uncharted Mariner Ink.

Use a glue gun to attach the shelf. The houses can be attached with hot glue on the side 1/4 inch panels. Attach the roofs.

Using the pallet knife, spread Snowfall Grit Paste on the shelf and the roof edges. Add Rock Candy Glitter using a Glitter Duster.

Use the hot glue gun to attach the trees in the center between the houses and the Quote Chip below the shelf.

Thanks so much for stopping by today! Be sure to visit The Funkie Junkie Boutique Shop and their fabulous creative blog. I'd love to have you follow/subscribe on my social media sites Instagram, Facebook, Blogger and YouTube.  Be well. Be creative!

I have linked to the products in the shop for your convenience! 

Retro Snowflakes CMS 417
Quote Chip


Nov 21, 2022

Ideology Layered Decor Piece

 Hello again friends. I had soooo much fun creating this fun holiday layered piece for The Funkie Junkie Boutique! You can win a $25.00 gift card by using Ideology Christmas Products and tagging The Funkie Junkie Boutique. We will choose one winner.


Nov 7, 2022

Play with the new Distress Ink Products

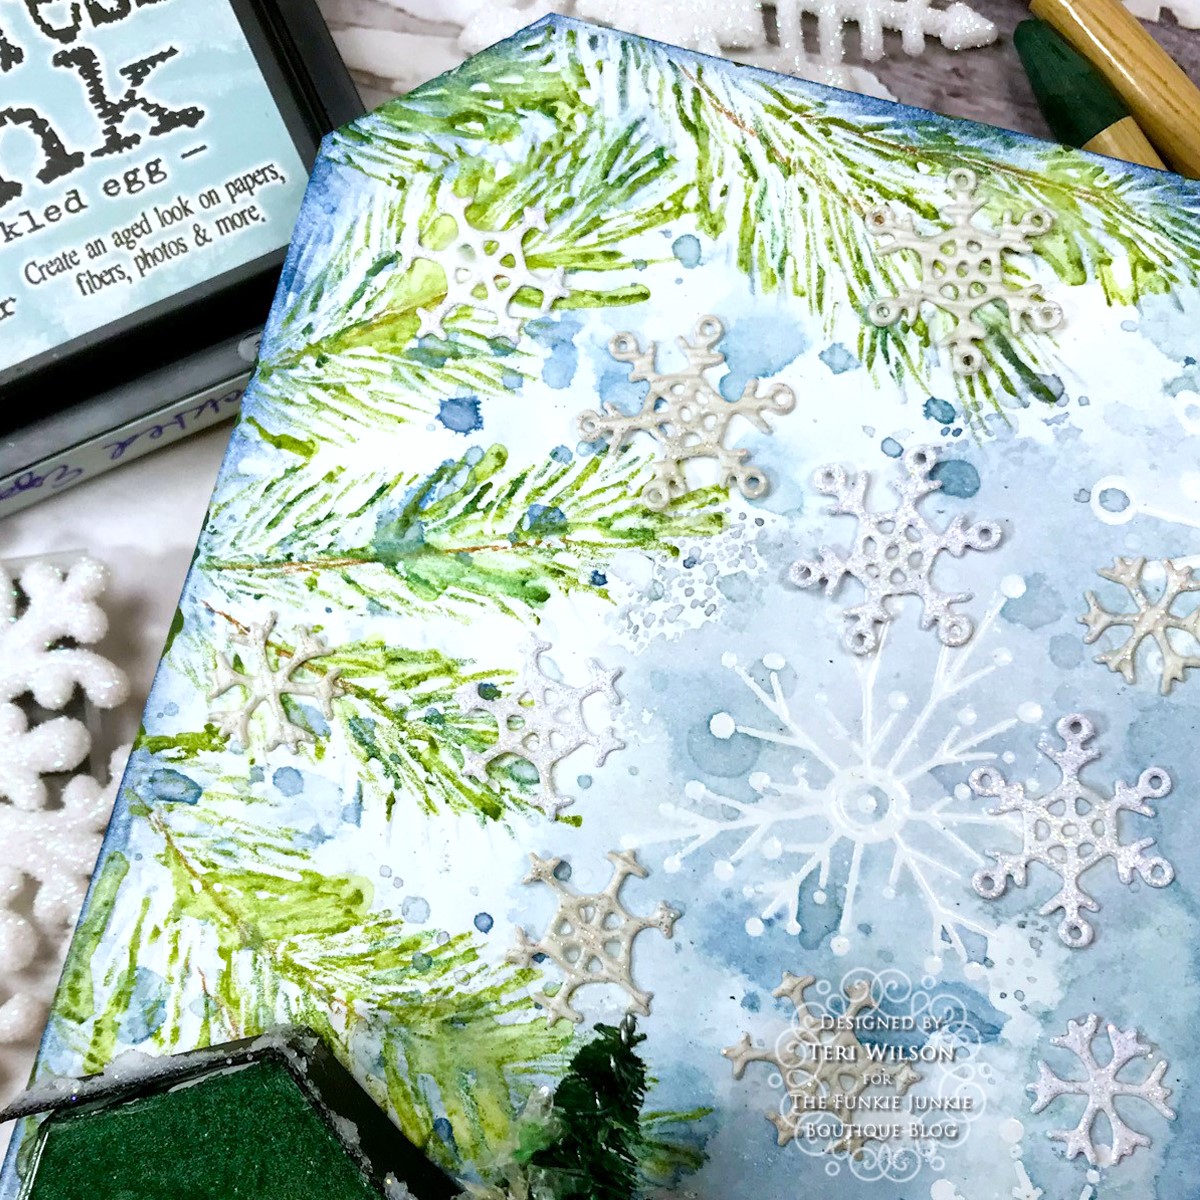
 Hello friends! I'm back with another Decor piece. This time a Vignette Box decorated for Winter posting for The Funkie Junkie BoutiqueYou can win a $25.00 gift card by using the new Distress Products and tagging The Funkie Junkie Boutique. We will choose one winner.


Oct 24, 2022

Pumpkins Everywhere!

 Hello Friends. Posting a very Fall Tag for The Funkie Junkie Boutique today. I love Fall colors of Teal and Orange so when the Designer Challenge was announced, I knew just what I was going to do!


Check out this gorgeous fall-colored tags with the Pumpkin Duo Die and the Acorn 3D Embossing Folder!

Sep 7, 2022

It's Back to School Time!

 Hello friends. Summer is coming to an end and we are moving into the School Year. I created this fun school themed Etcetera Tag for The Funkie Junkie Boutique. Our current theme is Back to School. 

Sep 4, 2022

Make Your Own Ephemera!

 Hello friends. I'm posting for The Funkie Junkie Boutique today. This Saturday Spotlght post is all about creating your own Ephemera using some of the new Sizzix dies including Vintage Labels, Collector and Specimen sets. In the end I created a journal cover, and I will walk you along creating the collection of ephemera pieces.


Check all the fun layers of Vintage Goodness here! 

Aug 10, 2022

Layered Beachy Scene

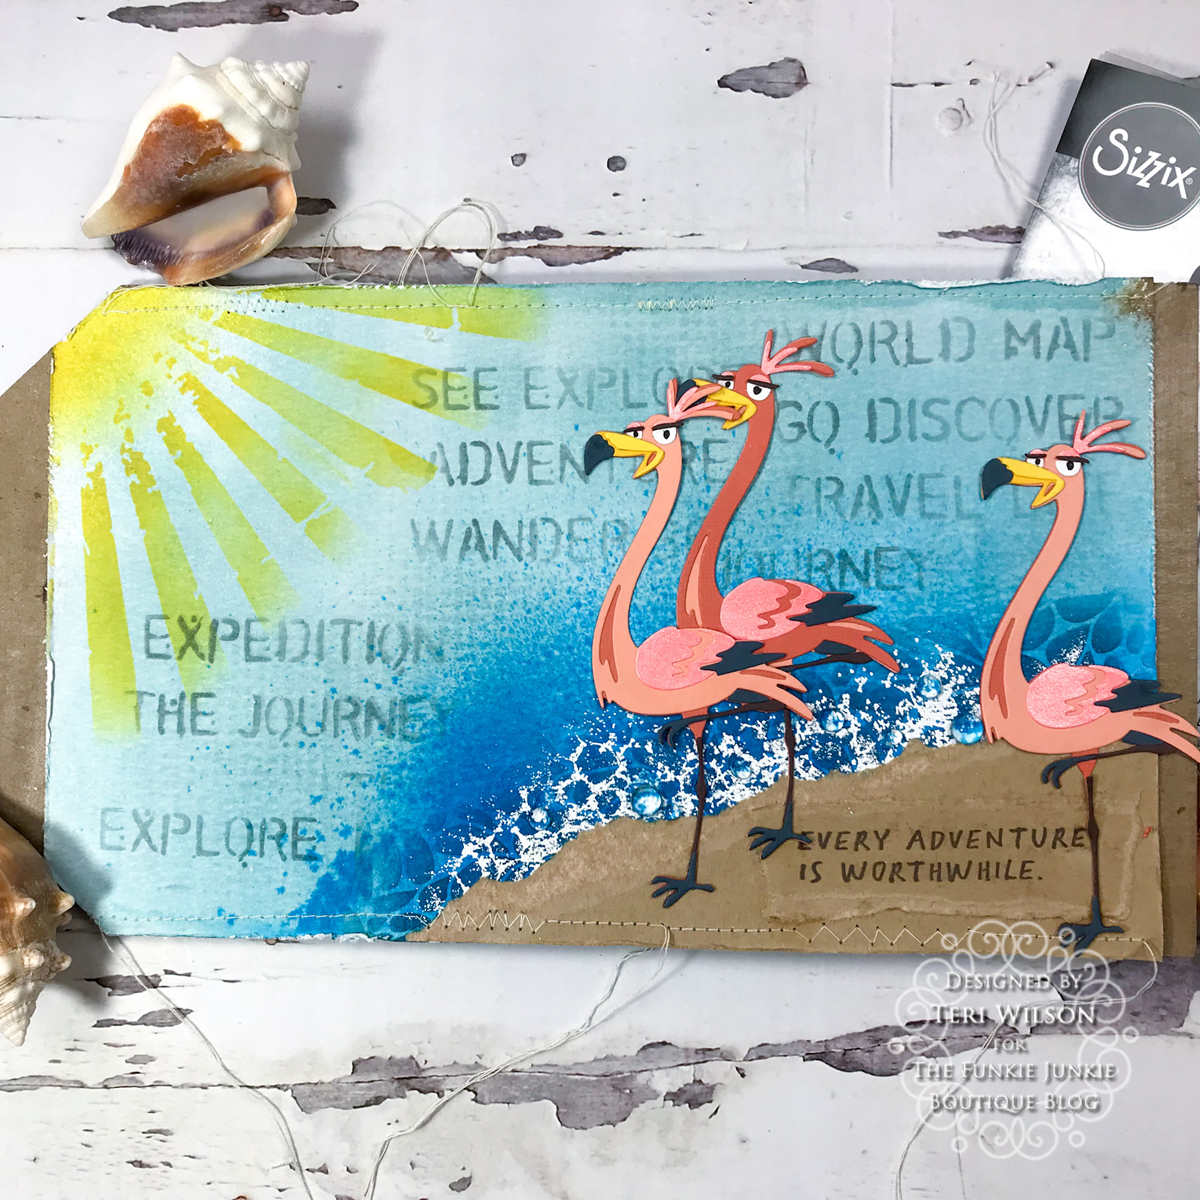
 Greetings Friends! Having a summery blast today posting for The Funkie Junkie Boutique! Our current Challenge is Chillin' in the Heat using either warmer or cooler colors. I'm headed to the beach with Glady's!  We have a challenge over on the Funkie Junkie Boutique Blog. Check the deets HERE. Would love to have you join in the fun!


The flock of flamingos appears quite happy in the sunshine!

Jul 13, 2022

Etcetera Tag in Motion

 Hello Funkie Friends!

 I'm posting another in my never-ending series of Etcetera Tag for The Funkie Junkie Boutique. Just kidding. I'm having too much fun to stop now! We have a fun challenge called Moving Parts. We'd love to have you join in the fun over on the Funkie Junkie Blog. You may win a prize.


Check out the movement on this short intro video.

Jun 1, 2022

Patriotic Layered Junk Journal Tag

 Hello friends, I am posting for the The Funky Junkie Boutique. The current challenge is a musical themed project. Check out the post on the blog for deets. 


The patriotic music themed Etcetera Tag is the perfect addition for our home decor!

Apr 20, 2022

Mix a Grungy Background with Colorful Flowers

 Can you mix a grungy grey, brown masculine background with bright and colorful flowers? I say go for t! See how I did just that in this post for The Funkie Junkie Boutique.

Check out the bright colors against the grungy background!

Apr 6, 2022

Floral Frilly Mixed Media Tag

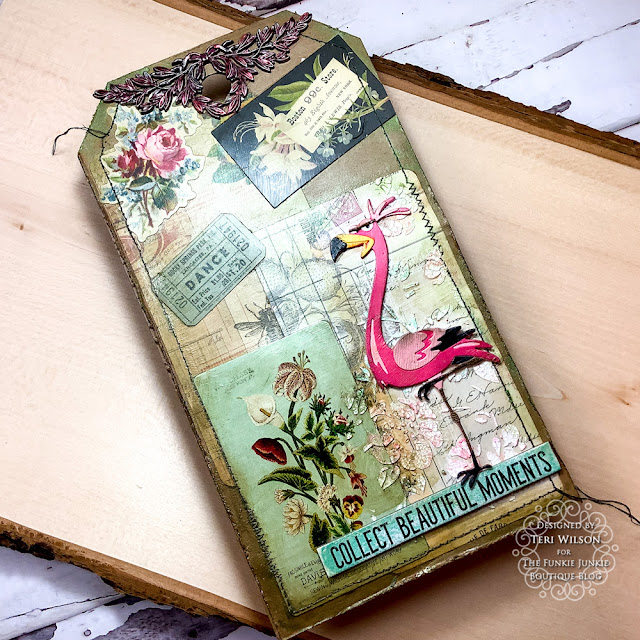
 Hello friends! I am posting for The Funkie Junkie Boutique today. The current challenge is April Showers bring May flowers. There are prizes. The deets are on The Funkie Junkie Boutique Blog. I am still on my Etcetera Tag kick so I present this floral layered mixed media tag!


Mar 9, 2022

Use Your Stash!

 Hello friends. I am posting for The Funkie Junkie Boutique! The current challenge called Blustery Day invites us to use a technique, tools or supplies you find difficult to use. Info on the current challenge is Here.

I am a Tim Holtz addict! I collect more than I use. I challenged myself to go through my stash and use it! I even share SOME of my collection with you before I start creating!


Feb 23, 2022

Mixed Media Journal Made with an Amazon Mailing Bag

 Hello friends. I am posting today for The Funkie Junkie Boutique. I am taking a short break from my Etcetera Tags to create this fun journal from a cereal box and a mailing envelope!


Feb 9, 2022

Layered Vintage Valentine Tag

 Greetings friends! I am posting this very vintage Etcetera tag for The Funkie Junkie Boutique. We have a new challenge up - Funky Frilly Valentines. Check out the blog Here for deets.


Lots of fun going on here tied together by magenta and Victorian Velvet colors. Victorian Velvet is not one of my go-to colors, but I loved the way it off sets the Magenta.

Recent Posts